

A pre-made A/C hose fits one vehicle. A hose you build fits the vehicle in your bay right now: the engine swap, the older truck with a discontinued line, the rear-air unit, the machine nobody lists a part for. This guide walks through the whole job in four phases — measure, cut, crimp, check — and explains why each step matters, so your first hose holds as well as your hundredth.
The four phases at a glance
Recover the refrigerant, then mock up your fittings on the vehicle and measure the hose run between them. Cut barrier hose square to that length, push it fully into a matching beadlock fitting, and crimp the ferrule with the die made for that hose size and type. Inspect the crimp, pressure-test the assembly with dry nitrogen or an Air Source system, then install it with new lubricated O-rings, evacuate the system, and charge by weight.
Measure
Mock up the fittings, plan the route, and measure hose stop to hose stop — not end to end.
Cut
One clean, square cut with a hose cutter or sharp blade. No saws.
Crimp
Seat the hose fully, match the die to the hose, center the ferrule, and crimp once.
Check
Inspect the crimp, pressure-test, install with new O-rings, evacuate, and charge.
In this guide: Before you start · How a crimped hose end works · Pick the hose · Pick the fittings · Tools & supplies · 1. Measure · 2. Cut · 3. Crimp · 4. Check · Common mistakes · Kits · FAQ
Recover first, and protect the open system
A hose job opens the refrigerant circuit, so three things come before any measuring.
Recover the refrigerant. It is illegal in the U.S. to knowingly vent refrigerant, and it has to be recovered with proper equipment by a certified technician. If you are a DIYer without a recovery machine, have a shop recover the system before you take anything apart. Shops that need certification can start with our Section 609 training page. R-1234yf systems need recovery and charging equipment built for R-1234yf; R-134a machines cannot be used on them. See R-1234yf tools.
Wear eye protection and gloves. Liquid refrigerant freezes skin on contact, and a system you believe is empty can still hold pressure.
Cap every open port the moment you disconnect it. Moisture is the enemy of an A/C system. It saturates the drier, and combined with refrigerant and oil it forms acids that attack the system from inside. Minutes matter, especially in humid weather.
Plan on a new drier or accumulator. Any time the system has been open to the air, replacing the receiver-drier or accumulator is standard practice. Its desiccant can only absorb so much moisture, and it has been absorbing the whole time the lines were off.
How a crimped hose end works
Most crimped A/C hose ends today are beadlock fittings. The name comes from the raised bead on the fitting that locks the outer shell (the ferrule) in place so it cannot slide. The hose slips over a barbed stem and inside the ferrule. The crimper then squeezes the ferrule down, clamping the hose wall between the ferrule and the barbs. Done right, that joint is permanent and will outlast the hose.
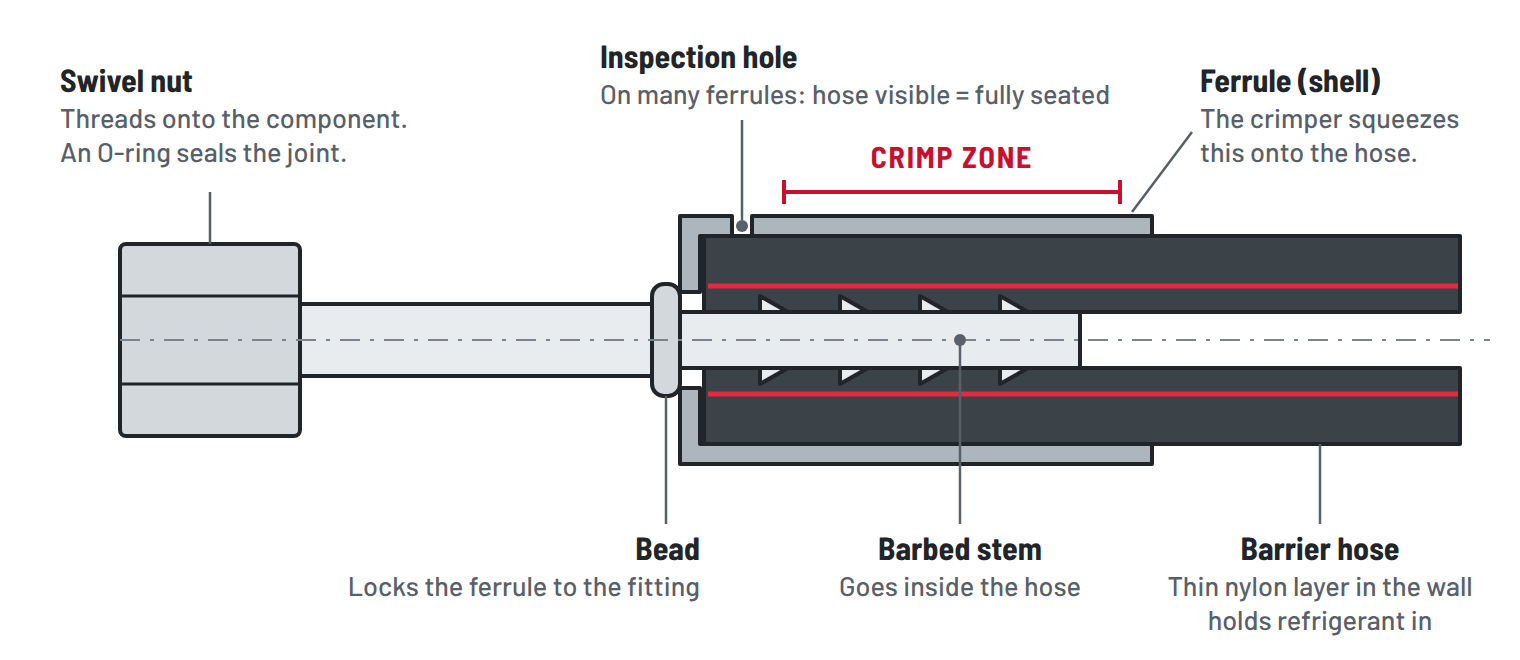
Two things follow from this design. First, the hose must be pushed all the way in before crimping, or the ferrule ends up gripping too little hose. Second, a beadlock fitting is single-use: once the ferrule is crimped it cannot be opened up and used again.
Beadlock is not the only style. Barbed fittings are secured with A/C hose clamps instead of a crimped ferrule. They earn their place in two situations: hard-to-reach areas where a crimper will not fit around the hose, and field work, where a truck or machine has to be running again without a trip to the bench. This guide covers the crimped beadlock method, which is what shops use for permanent, OE-style assemblies, and points out where barbed fittings are the better call.
Pick the right hose
Use only refrigerant barrier hose. Refrigerant molecules are small enough to seep through ordinary rubber, so A/C hose has a thin nylon barrier layer built into its wall. Fuel hose, heater hose, and hydraulic hose are not substitutes, whatever their pressure rating says.
Our recommendation: standard barrier hose. It is what we generally recommend for custom hoses, and the bulk hose we stock is a superior-quality standard barrier hose. The thicker wall stands up well to engine-bay heat and abrasion, and it matches the standard beadlock fittings and crimp dies most shops already own. It is available by the foot and in 25 ft and 50 ft rolls.
Size
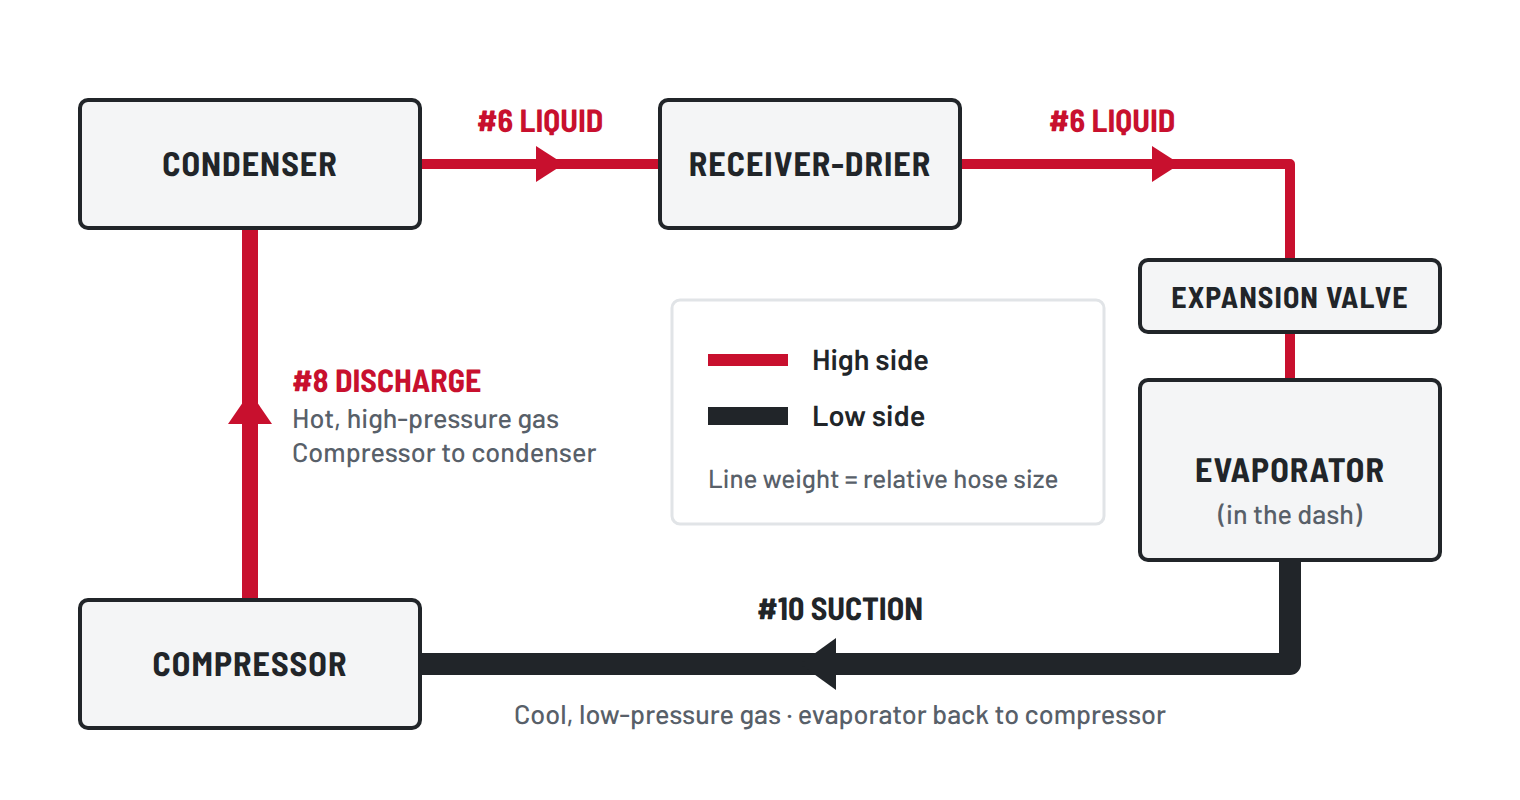
A/C hose and fittings share a number system. Match the Size of the hose to the Size of the fitting: #8 hose takes a #8 hose end.
| Size | Hose (inside diameter) | Where you typically find it |
|---|---|---|
| #6 | 5/16″ | Liquid line: condenser to drier, drier to expansion valve or orifice tube |
| #8 | 13/32″ | Discharge line: compressor to condenser |
| #10 | 1/2″ | Suction line: evaporator or accumulator back to the compressor |
| #12 | 5/8″ | Suction line on larger systems: rear air, heavy duty, some trucks |
“Typically” is doing real work in that table. Manufacturers vary, so always match the hose that came off the vehicle or the ports on the components you are connecting.
Standard barrier vs. reduced barrier
Barrier hose comes in two wall thicknesses. Standard barrier has the thicker wall. Reduced barrier has the same inside diameter but a thinner wall and smaller outside diameter, which makes it lighter and easier to route in tight engine bays.
The rule that prevents most leaks: hose, fitting, and crimp die must all be the same type. Standard barrier hose takes standard beadlock fittings and standard dies. Reduced barrier hose takes reduced barrier fittings and reduced barrier dies. Mix them and the ferrule either cannot compress the hose enough (a leak) or crushes it (a cut liner, and a leak later).
Standard barrier is our default recommendation. Reduced barrier has its place where the routing is tight or you are matching what the vehicle was built with.
Not sure what is on the vehicle? Reduced barrier hose is visibly slimmer than standard hose of the same Size, and the type is usually printed along the hose. When in doubt, call us at 480-507-2229 before you order.
Hose for R-1234yf systems
Most new cars and light trucks are now built with R-1234yf instead of R-134a, and there is newer hose made for these systems. If you are building a hose for an R-1234yf vehicle, use hose that is marked as rated for R-1234yf rather than assuming whatever is left over from R-134a work will do. Call us at 480-507-2229 for current R-1234yf hose options.
The build process in this guide is the same for both refrigerants. What changes around it: R-1234yf is classified as mildly flammable, it has its own recovery and charging equipment, its service ports are a different size so R-134a equipment cannot be connected by mistake, and it has its own O-rings and seals.
Pick the fittings
Every hose end has two jobs: grip the hose on one side and seal to a component on the other. The hose side is covered above (beadlock, matched to your hose). For the component side, check four things. These are the same labels used on every Air Components fitting page.
O-ring fittings
The standard on R-134a vehicles, and on R-1234yf vehicles as well. A swivel nut pulls the joint together and an O-ring makes the seal.
Shop O-ring fittings →Flare fittings
Found on many R-12-era vehicles and some aftermarket components. The seal is metal to metal on the flare, with no O-ring.
Shop flare fittings →With service ports
Builds a charging port into the hose end. Useful when a custom system needs a high- or low-side port where none exists. R-134a and R-1234yf ports are different sizes, so match the port to the refrigerant.
Shop fittings with ports →Splicers
Join two pieces of hose, or replace a damaged section without rebuilding the entire line.
Shop splicers →Metric fittings
Many import vehicles use metric threads. Identify the thread before ordering; it will not start on an SAE port.
Shop metric fittings →Bulkhead fittings
A clean, sealed pass-through for custom builds, so the hose is not rubbing on sheet metal.
Shop bulkhead fittings →Tip: pick a 45° or 90° fitting instead of bending the hose hard right at the crimp. A hose that leaves the ferrule under side load works against the crimp every time the engine moves.
Where a crimper will not reach: for a repair buried behind the engine or under the dash, or a breakdown in the field, barbed fittings and A/C hose clamps let you make the joint in place with hand tools. Use clamps made for A/C hose and sized to the hose, not generic worm-drive clamps.
Tools & supplies
| You need | Why | Where |
|---|---|---|
| A/C hose crimper with dies | Beadlock ferrules can only be set with a die-type crimper. Pliers, vises, and generic hydraulic crimpers will not produce a sealed crimp. | Hose crimpers & dies |
| Barrier hose | Sized and typed to match your fittings. | A/C hose |
| Beadlock fittings | One per hose end, plus a spare while you are learning. | All fittings |
| Hose cutter | A square, clean cut with no debris. A fresh, sharp blade also works. | Hose cutter (242-968) |
| Tape measure & paint pen | Cut length, plus the small inspection mark that confirms depth and clocking. | — |
| Refrigerant oil | Lubricates the stem for assembly and the O-rings for install. Use the oil type the system runs on. | — |
| New O-rings | Every joint you open gets a new one. Never reuse them. | A/C O-rings · R-1234yf |
| Test gas, regulator & leak solution | To pressure-test the hose before refrigerant goes in. Dry nitrogen is the standard; an Air Source CO2 or high-pressure air system does the same job from a portable cylinder. | Air Source systems · Nitrogen regulator · Leak detection |
| Barbed fittings & A/C hose clamps (optional) | For joints in hard-to-reach areas and for field repairs, where a crimper will not fit or is not on the truck. | Barbed fittings · Hose clamps |
| Vacuum pump, gauges & scale | To evacuate and charge the system when the hose is installed. | Vacuum pumps · Gauges |
Manual or hydraulic crimper? Both make the same crimp with the same style of dies. A manual crimper is the lower-cost way in and is fine for occasional hoses. A hydraulic hand crimper (242-1276) takes far less effort per crimp, which matters when you build hoses every week or have to crimp in place on the vehicle.
Measure
Plenty of first hoses fail at the tape measure, not the crimper: too short to reach, or long enough to rub on something. Slow down here and the rest is easy.
Plan the route
If you are replacing an existing hose, keep it. It is your pattern for length, fitting angles, and clocking. If you are routing from scratch, follow these rules:
- Stay away from heat and motion. Keep clear of exhaust manifolds, turbo plumbing, belts, fans, steering shafts, and sharp sheet-metal edges.
- Leave slack for engine movement. The compressor moves with the engine, and the condenser and firewall do not. A hose pulled tight between them will be working against its crimps every time the engine rocks.
- Do not force tight bends. If the hose starts to flatten or kink in a bend, the bend is too tight. Reroute it, or use an angled fitting to do the turning.
- Support long runs. Clamp the hose so it cannot sag or chafe, and sleeve it anywhere it has to pass near an edge.
Mock up the fittings, then measure
Thread each fitting onto its component by hand and point it the way the hose needs to leave. Now measure the run between them. What you want is the cut length: the length of hose from where it bottoms inside one fitting to where it bottoms inside the other.
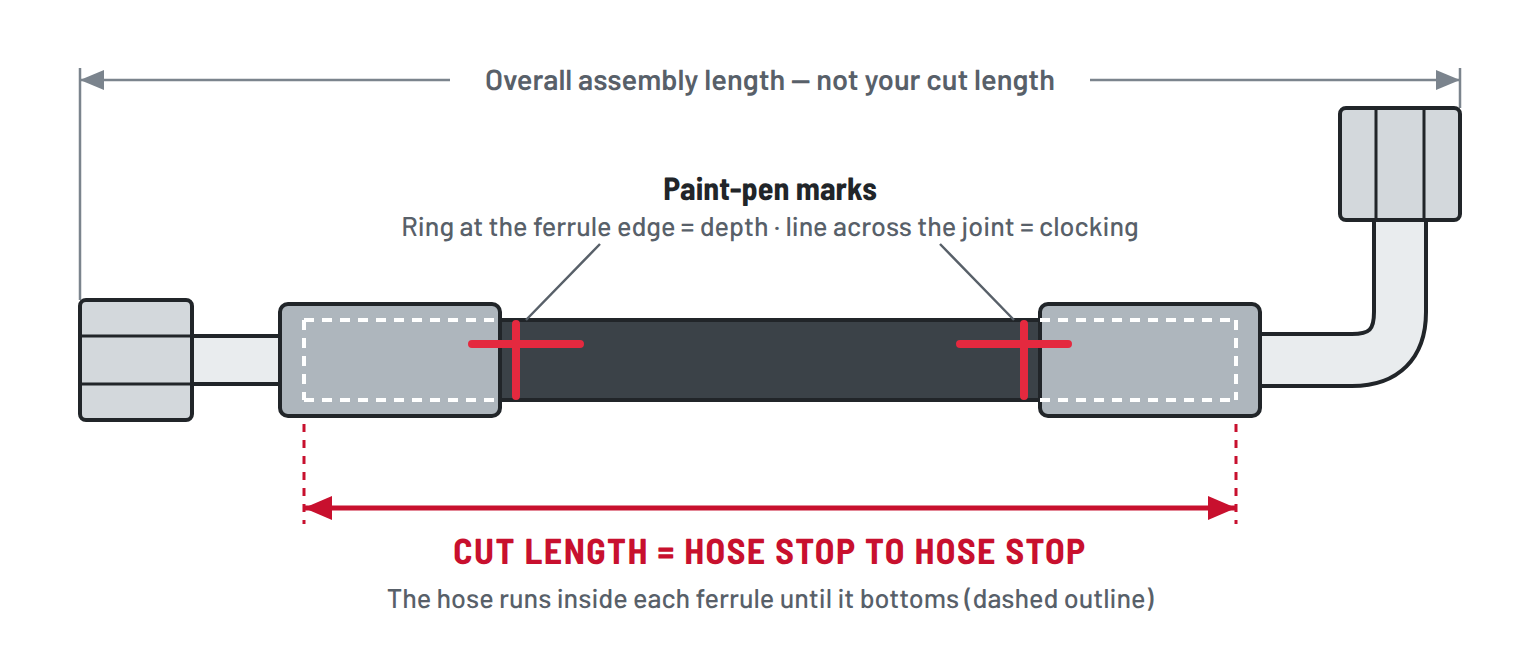
The most reliable method needs no math. Push the uncut hose fully into the first fitting, lay it along the real route with the slack you want, and hold it alongside the second fitting. Mark the hose where it would bottom inside that ferrule, and that mark is your cut line. If you are copying an old hose, measure the hose itself, not the full assembly, and add back the amount hidden inside each ferrule.
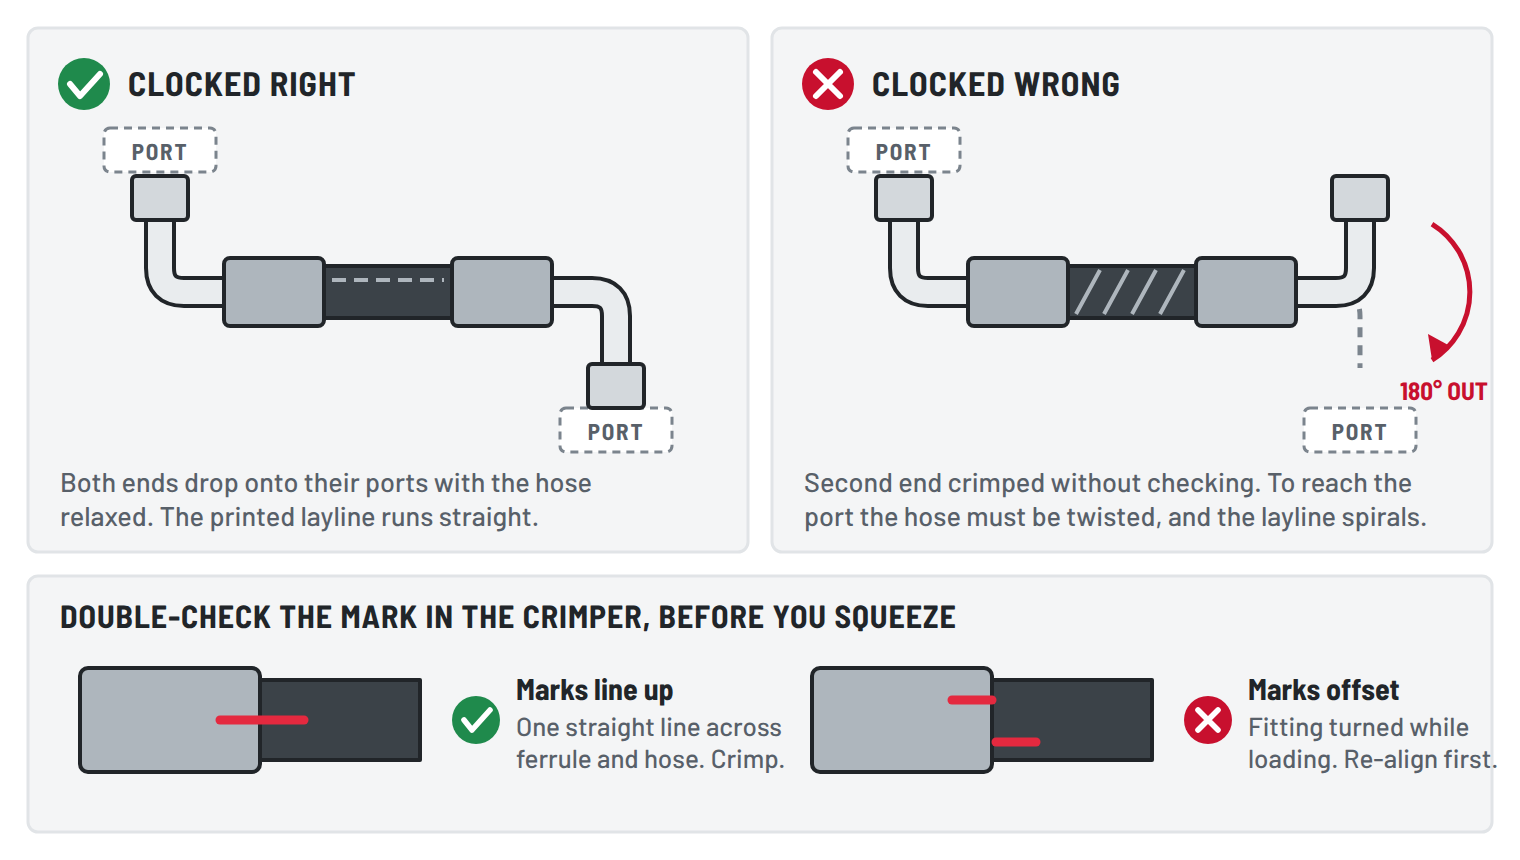
Clocking matters on angled ends. Once both ends are crimped, the hose will not twist to let you re-aim a 45° or 90° fitting. With two angled ends, crimp one end first, install that end, aim the second fitting where it needs to point, and draw a paint-pen line across the ferrule and hose before you take it back to the crimper.
Cut
Make one clean, square cut with a hose cutter or a fresh, sharp blade. Two things matter:
- Square. An angled cut means one side of the hose bottoms in the fitting while the other side stops short, so part of the ferrule ends up with less hose under it.
- Clean. Do not use a hacksaw or cutoff wheel. They fray the reinforcement and leave rubber and abrasive dust inside the hose, and that debris goes straight to the expansion valve or orifice tube, and eventually the compressor.
After cutting, look down the bore and blow it out with dry nitrogen or clean, dry air. Check that the inner liner was not torn or pulled loose by the blade.
Crimp
Seat the hose
Put a drop of refrigerant oil on the barbed stem and push the hose into the fitting with a slight twist until it bottoms out. Confirm it: many ferrules have a small inspection hole near the fitting end, and you should see hose through it. If yours has no hole, hold the fitting beside the hose beforehand, mark the insertion depth on the hose, and push until the mark reaches the ferrule.
Now make a small paint-pen mark across the joint, starting on the ferrule and running onto the hose. We put this mark on every hose, because it is the quickest inspection there is, and it does two jobs. Depth: if bare hose shows up between the ferrule and the mark, the hose crept out. Clocking: if the two halves of the mark no longer line up, the fitting has rotated on the hose.
Choose and load the die
Dies are made for one hose Size and one barrier type. A #10 standard barrier die and a #10 reduced barrier die are different parts that produce different crimp diameters. Dies are normally marked, so check the marking against your hose, then seat both halves fully in the crimper.
Double-check your clocking
This is the check that gets skipped, and it is the one you cannot undo. Carrying the hose to the bench and loading it into the dies is exactly when an angled fitting gets bumped around. Before you close the dies on the second end, look at your mark. If the halves still form one line, crimp. If they are offset, turn the fitting back until they line up, confirm the hose is still bottomed, and then crimp.
Position and crimp
Center the ferrule in the die. The die should sit over the body of the ferrule: not hanging off the hose end, and not riding up onto the bead end. Take one last look at your mark, then crimp in one continuous operation. On most die-type A/C crimpers the crimp is complete when the die halves close fully, but your tool’s instructions are the authority on that.
Release the tool, remove the hose, and repeat on the other end after re-checking your clocking.
About crimp diameter. Fitting and crimper manufacturers publish a finished crimp diameter for each hose and fitting combination. If you have that spec for your parts, measure across the crimp with calipers and compare. We have deliberately not printed a diameter chart here, because the numbers differ by hose type and fitting maker, and a generic chart is how good hoses get condemned and bad ones get installed.
Check
Inspect the crimp
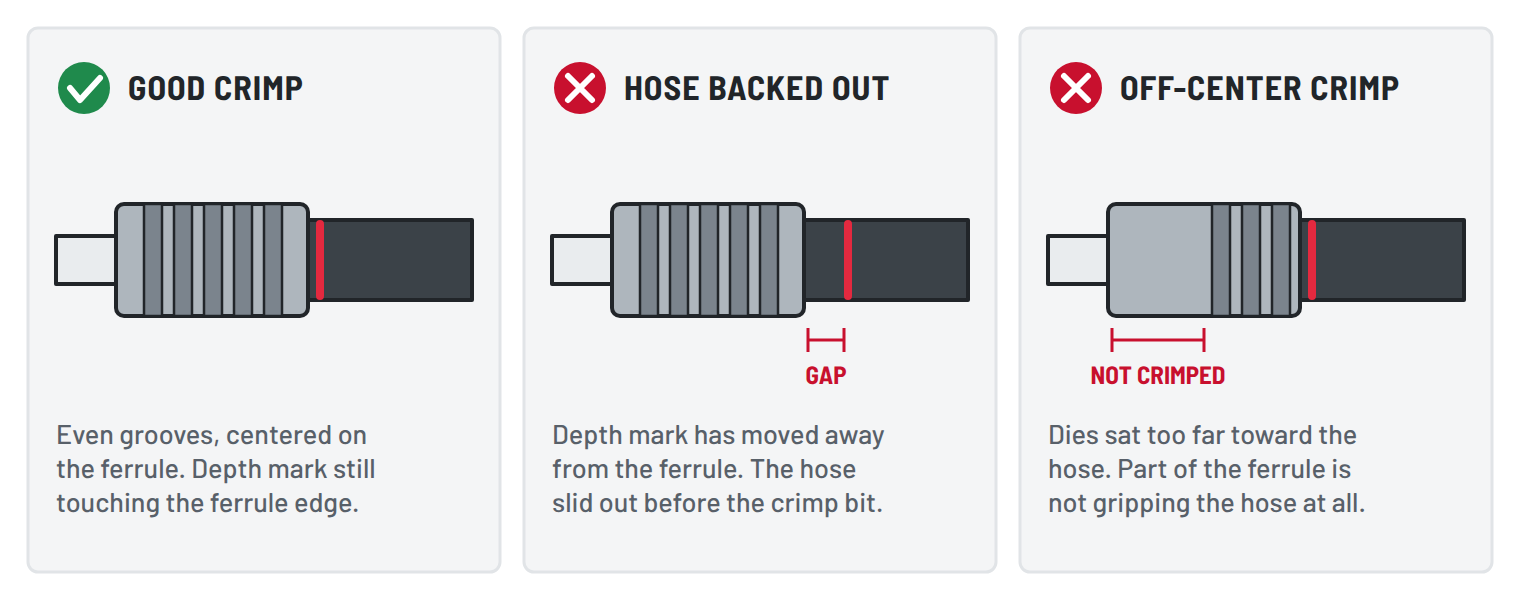
A good crimp is even all the way around, centered on the ferrule, and free of cracks. Your paint mark still lines up, with no bare hose showing between it and the ferrule, and angled fittings point where you set them. A crimp that is off-center, made with the wrong die, or made on a hose that was not seated cannot be fixed by crimping again. Cut the end off and start over with a new fitting. That is what the spare was for.
Pressure-test before refrigerant goes in
Refrigerant is expensive and venting it is illegal, so find leaks with a dry test gas first. Dry nitrogen is the industry standard. An Air Source system does the same job from a portable cylinder you can take to the vehicle. You can cap the hose and test it on the bench, or install it and test the whole system. Pressurize through a regulator, apply leak-detection solution to both crimps and every joint you opened, and watch the gauge for a drop.
Air Source Complete CO2 Package
10 lb liquid CO2 cylinder, Series 3000 non-freezing regulator with dual gauges, coil hose with quick connects, vehicle mount bracket, and digital tire inflator. CO2 is a dry, inert gas.
View the CO2 package →Air Source Complete 3000 PSI Air System
63 cu ft, 3000 PSI aluminum cylinder, Series 3000 regulator with dual gauges, and coil hose with quick connects. A regulated air supply that does not depend on the shop compressor.
View the air system →Inert Gas / Nitrogen Regulator
Already have a nitrogen cylinder? This is the Series 3000 regulator with dual gauges for inert gas and nitrogen.
View the regulator →- Use the test pressure from the vehicle or component manufacturer’s service information, and never exceed the rating of the weakest part in the loop. That is often the evaporator.
- Do not use air from the shop compressor line. It carries moisture and compressor oil, which is exactly what you have been keeping out.
- Recover completely before you pressurize. Never add compressed air to a system that still holds refrigerant. On R-1234yf systems, where the refrigerant is mildly flammable, stay with an inert gas: nitrogen or CO2.
- Stay inside the ratings of the regulator, the hose assembly, and the system you are testing.
- Never use oxygen or any flammable gas. Oxygen and refrigerant oil can ignite under pressure.
No test gas on hand? As an alternative, install the hose, pull the system into a deep vacuum, close the valves, shut the pump off, and let it sit for 30 minutes. If the gauge has not moved, the system is holding. A vacuum puts far less pressure difference across a joint than a pressure test does, so a very small leak can get past it. Follow up with UV dye or an electronic detector once the system is charged.
Install
- New O-rings, the right Size and material, every time. Coat each one with the system’s refrigerant oil so it slides into place instead of rolling or tearing. R-1234yf systems have their own O-rings and seals. See A/C O-rings and R-1234yf O-rings & seals.
- Start every nut by hand. A/C fittings are usually aluminum and cross-thread easily.
- Use two wrenches. Hold the fitting body with one and turn the nut with the other, so the torque goes into the joint and not into twisting the tube or the hose.
- Tighten to the specified torque. On an O-ring fitting the O-ring makes the seal, not brute force. Overtightening distorts the joint and causes the leak you were trying to prevent.
- Replace the drier or accumulator, and add back any refrigerant oil the service information calls for when a line is replaced.
Evacuate, charge, and verify
Pull the system into a deep vacuum with a vacuum pump, close the valves, and confirm the vacuum holds; we suggest 30 minutes. Evacuation removes air and boils off moisture, and the hold test is one more leak check. Then charge by weight to the vehicle’s specification, with the refrigerant the system was built for. R-134a and R-1234yf are not interchangeable. Run the system, check vent temperature and pressures, and go over your new crimps and joints with an electronic detector or UV dye and a light.
Nine mistakes that make custom hoses leak
- Mixing barrier types. Reduced barrier hose in a standard fitting, or the wrong die for either. This is the most common cause of a leak at the crimp.
- Measuring the assembly instead of the hose. Cut length is hose stop to hose stop.
- Forgetting to clock angled ends, or not re-checking the mark once the hose is in the crimper. The hose will not twist for you afterward.
- Cutting with a saw. Debris in the bore ends up in the expansion valve and the compressor.
- Not bottoming the hose. Use the inspection hole or a depth mark, every time.
- Crimping off-center, or trying to rescue a bad crimp by crimping again.
- Reusing O-rings, or installing them dry.
- Skipping the pressure test and finding the leak with a full charge of refrigerant.
- Routing tight or hot. No slack for engine movement, or a run too close to the exhaust.
Hose-building kits
The matching problem (hose, fittings, dies) is the hardest part of getting started. A kit solves it by putting all three in one box. Both of these include a crimper with dies, #6, #8, and #10 barrier hose, and 55 fittings: five each of straight, 45°, and 90° O-ring fittings in all three Sizes, plus service-port fittings.
A/C Hose MFG Start-Up Kit (231-1000)
Manual crimper with dies and 30 ft of hose, 10 ft of each Size. The lower-cost way to start building hoses.
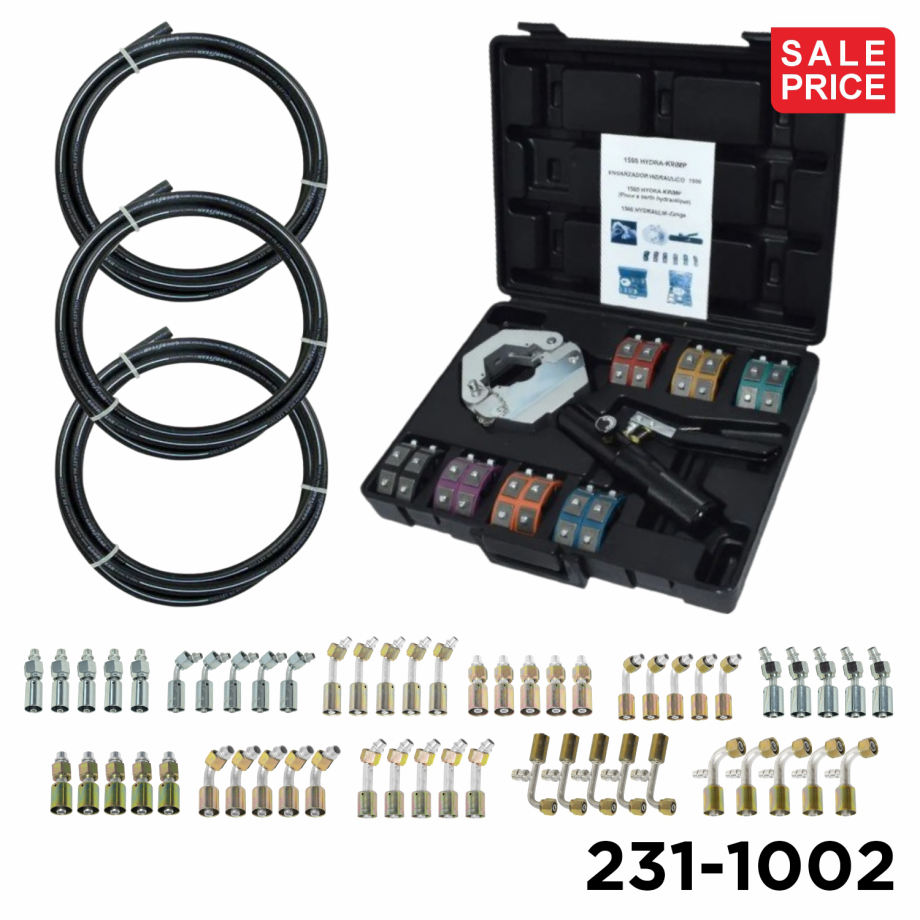
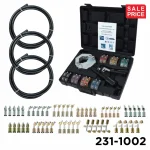
A/C Hose Master Builder Kit (231-1002)
Hydraulic crimper with dies and 75 ft of hose, 25 ft of each Size. For shops that build hoses regularly.
| Image | Product Name | SKU | Price | In Stock | Quantity | Add To Cart |
|---|---|---|---|---|---|---|
|
AC Hose Hot Rod Kit 14 Hose Fittings, 18 Feet Of Hose, Drier, Bracket &1 Application Of Fluoro-Dye | 231-1001 | $131.40 | 95 in stock | ||
|
AC Hose MFG Start Up Kit , Manual Crimper 55 Fittings And 30 Feet of Hose | 231-1000 | $329.00 | 99 in stock | ||
|
AC Hose Master Builder kit With Hydraulic Crimper, 55 Fittings and 75' of Hose | 231-1002 | Original price was: $649.95.$549.00Current price is: $549.00. | 52 in stock |
When it makes sense to have the hose built
Building your own pays off when you do it regularly. For a one-off, or a line with a special end (a welded tube section, a muffler, a manifold block, or a fitting you cannot identify), it is often faster to have the assembly made or repaired for you. Send the old hose as a sample or give us your measurements and end types through our hose repair & manufacturing service.
Building rigid lines instead of flexible hose? See our guide to building custom aluminum A/C lines for hot rods.
Custom A/C hose FAQ
Can I make my own A/C hoses?
Do I need a special crimper for A/C hose?
Can I use hose clamps instead of crimping?
What size A/C hose do I need?
What is the difference between standard and reduced barrier hose?
Can I use fuel hose or hydraulic hose for A/C?
How do I measure for a custom A/C hose?
How do I know if my crimp is good?
Can I reuse an A/C hose fitting?
Can I fix a bad crimp by crimping it again?
Can I pressure-test an A/C hose with shop air?
Can I leak-test with a vacuum instead of pressure?
Is building a hose for an R-1234yf system different?
Do I have to replace the drier when I replace a hose?
Can Air Components build or repair the hose for me?
Start with a matched kit, or ask us first
Hose, fittings, and dies that are made to work together. Not sure which hose type, Size, or fitting you have? Call with the vehicle and what you are connecting, and we will help you get the right parts the first time.
Shop hose-building kitsCustom hose helpThis guide is general technical information for qualified technicians and experienced DIYers. Always follow the vehicle manufacturer’s service information, your crimper’s instructions, and applicable refrigerant-handling regulations. Refrigerant must be recovered, not vented.