

Every A/C system has to get two lines through the firewall. On a factory car someone already solved that problem; on a hot rod, a restomod, a cab-over conversion or any system you are building yourself, it is yours to solve. A bulkhead fitting is the clean answer: the line terminates at the panel instead of passing through it, so the hole is sealed, the hose cannot saw its way through sheet metal, and either side can be disconnected without pulling the whole system apart.
In this guide: Why not just pass the hose through · How a bulkhead fitting works · One fitting or one plate · What we stock · Planning the pass-through · Installing it · When a bulkhead is not the answer · Common mistakes · FAQ
Why not just run the hose through a hole
Plenty of systems are built that way, and plenty of them come back. A hose passing through a panel has four problems, and they get worse with time rather than better.
It chafes
The engine moves on its mounts and the hose moves with it. A barrier hose rubbing a sheet-metal edge wins for a while, then loses. The failure is a leak in a spot you cannot see.
It does not seal
Whatever you pack the hole with, you are sealing against a hose that moves. Engine heat, water and noise all come through the gap, into the cabin.
It fights you later
One continuous hose means pulling the whole run to change either end, usually with the dash half apart.
What a bulkhead changes. The hose stops at the panel and a second hose picks up on the other side. The hole is filled by a machined fitting clamped to the metal, so nothing rubs and nothing moves. Each side can be built, pressure-tested and replaced on its own. On a build where the evaporator goes in before the dash, that alone is worth the part.
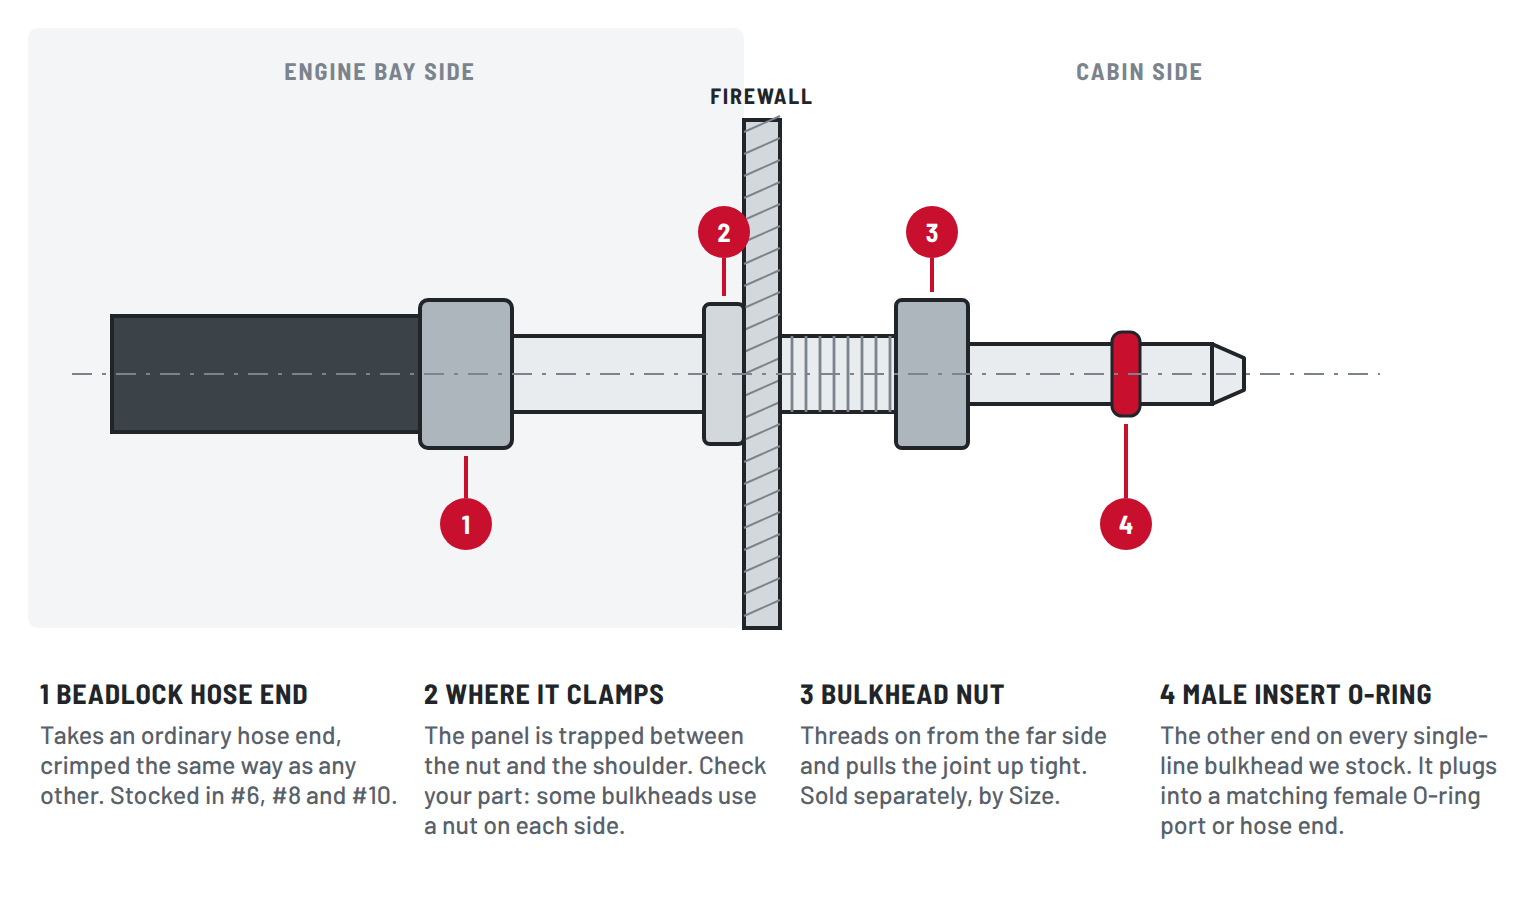
A bulkhead fitting in cross-section
A single-line bulkhead fitting is one piece of machined stock with a hose end on one side, a threaded section in the middle, and a port end on the other. The panel is captured in the middle. Every single-line bulkhead we stock is a male insert O-ring end paired with a beadlock hose end, in #6, #8 or #10.
Panel thickness is not published. None of our bulkhead listings state a panel thickness range, a plate dimension or a hole size. A firewall on a ’32 roadster and a firewall on a work truck are not the same piece of metal. Measure your panel and call 480-507-2229 before you drill — we would rather answer the question than take the return.
One fitting per line, or one plate for all of them
Both are stocked and both are right, for different jobs. The deciding question is whether your lines arrive at the firewall together.
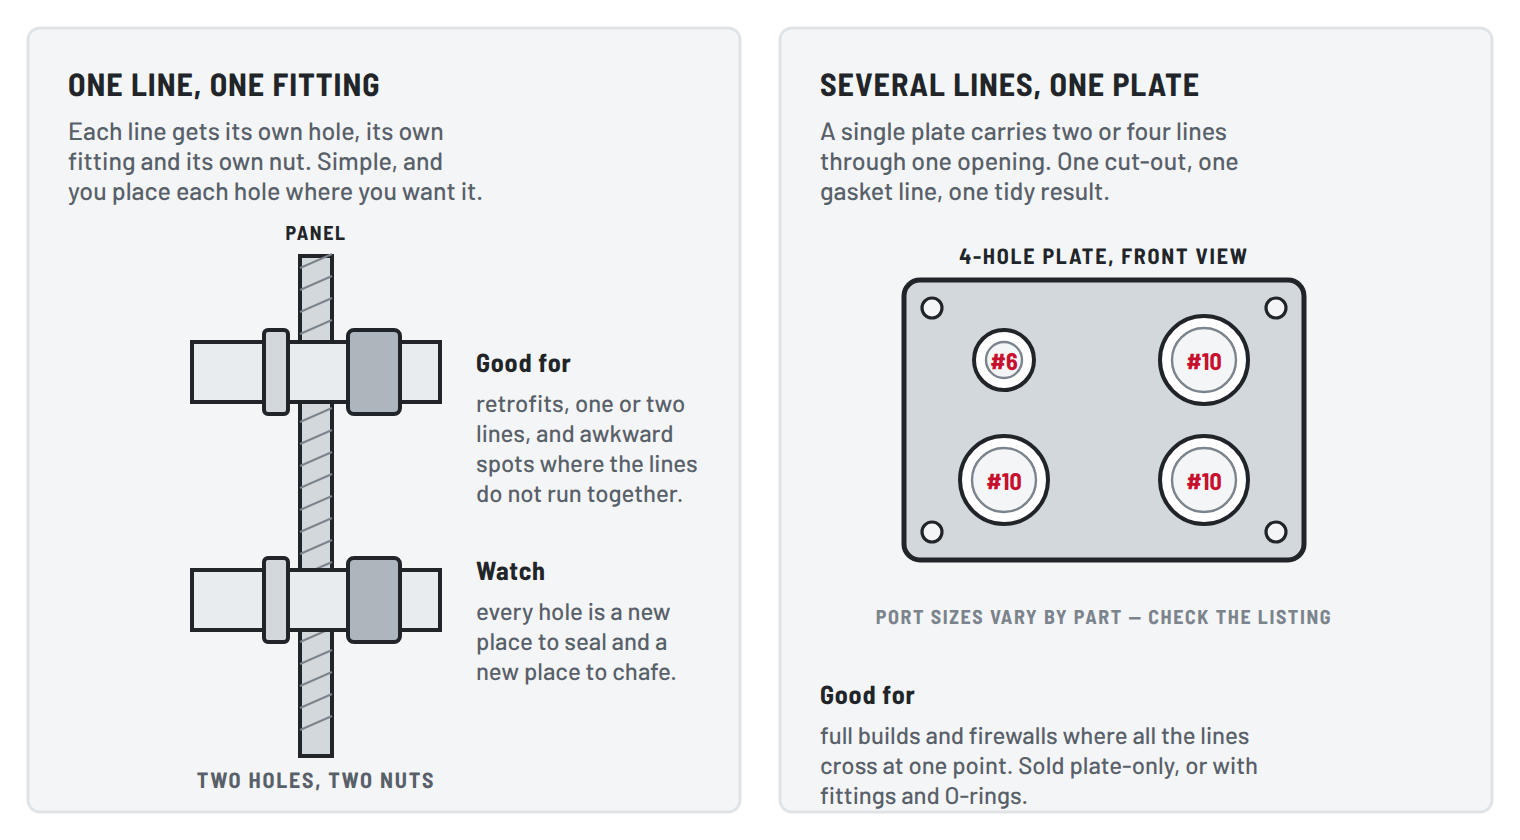
Separate fittings suit a retrofit or a two-line system, and anywhere the suction and liquid lines approach the firewall from different directions. Each hole is independent, so you can put them where the structure allows rather than where a plate demands.
Plates suit a full build, where you are cutting the firewall anyway and all the lines cross at one point. You make one opening, seal one perimeter, and the result looks deliberate. Our plates come in 2-hole and 4-hole patterns, in rectangle, square and diamond layouts, plain or black anodized, and some include the fittings and O-rings while others are the plate only.
Read the part name carefully on plates. The names carry the port sizes and whether fittings are included — for example “#6, #10 Rectangle 2 Hole W/Fittings” versus “Plate Only #6 & #10 Rectangle 2 Hole.” Two listings can look nearly identical and differ by everything in the box. Check the bulkhead category and, if the name leaves any doubt, call before ordering.
What we stock
Single-line bulkhead fittings, by Size and Design. All are male insert O-ring on the port end and a hose end of the same Size on the other.
| Design | #6 | #8 | #10 |
|---|---|---|---|
| Straight | 235-1633 | 235-1635 | 235-1637 |
| 90° | 235-1639 | 235-1641 | 235-1643 |
| Bulkhead nut | 235-3052 | 235-3053 | 235-3054 |
| Standard O-ring, 10-pack | 233-3024 | 233-3047 | 233-3088 |
Several of the straight fittings sit at URLs left over from earlier products, so the web address may describe a different part than the page does. Go by the part number and the page title, both of which are correct. We are cleaning the addresses up.
Multi-line plates are listed individually in the bulkhead category, including 2-hole #6 + #10 and #10 + #10 patterns, 4-hole #6 + #10 + #10 + #10 patterns in rectangle, square and diamond layouts, a heater version, black anodized versions, and a plate-only option. No #12 bulkhead fitting is stocked; if you are running #12 through a panel, call and we will work out the approach with you.
Planning the pass-through
Almost every bulkhead problem is decided before a hole exists. Spend the time here; the drilling takes two minutes and is permanent.
Find the flat
You need a flat, accessible patch of panel big enough for the fitting or plate plus a wrench, with clearance behind it. Firewalls are full of ribs, braces, wiring looms, pedal boxes and HVAC ducting, and the cabin side is usually the one that surprises you. Look at both faces before you commit.
Check what is behind the metal
Wiring, brake lines, the fuse box, the steering column. A hole saw through a firewall is an act of faith unless you have looked. On an unfamiliar vehicle, drill a small pilot and inspect before opening it out.
Pick the angle now, not later
Decide whether each line leaves the panel straight or turns, and buy the fitting to match. Forcing a straight fitting to turn puts the bend at the crimp, which is the one place a hose has no flexibility. We stock 90° bulkheads in all three sizes for exactly this reason.
Dry-fit with the hoses on
Assemble the run loosely and hold it in place before anything is crimped or drilled. This is when you find out that the 90° points at the brake booster.
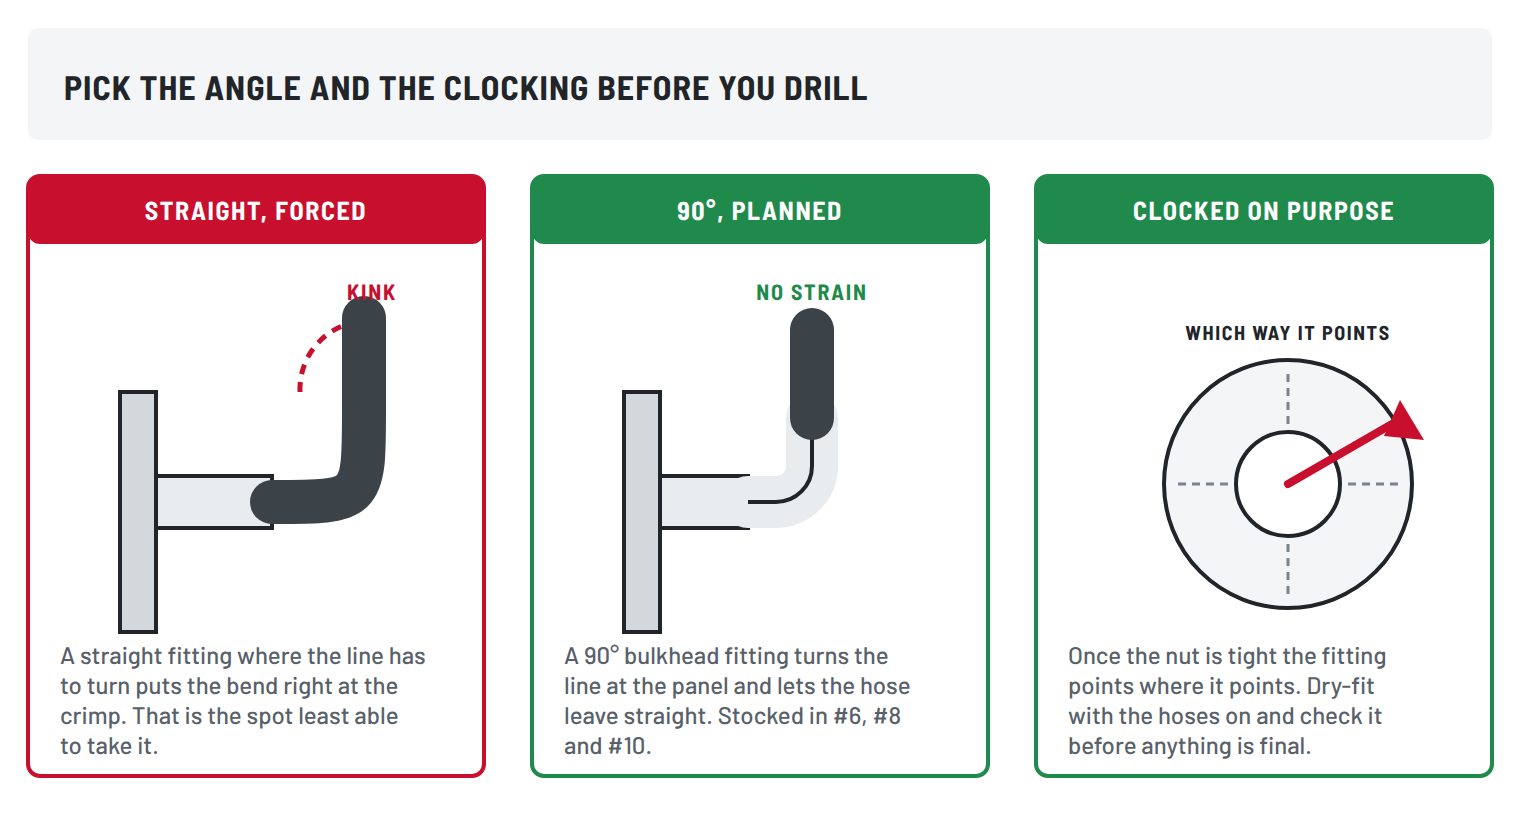
Clocking applies here too. A 90° bulkhead fitting has a rotational position, and so does the hose end crimped onto it. Mark the hose before you crimp, check the mark, and check the fitting’s rotation against the dry-fit before you tighten the nut. It is the same discipline as clocking a hose end, one step further along.
Installing a bulkhead fitting
1 · Mark from the part
Hold the fitting or plate on the panel and mark through it. For a plate, mark the mounting holes at the same time so the pattern cannot drift.
2 · Cut the hole
Pilot first, then open to size. A step drill or hole saw gives a rounder hole than a twist bit in sheet metal, and a rounder hole seals better.
3 · Deburr both faces
Not optional. A burr is a knife edge against the fitting shoulder, the seal and eventually the hose. Deburr, then clean the bare metal and treat it — you have just made a raw edge in a panel that lives between engine heat and road spray.
4 · Dry-fit and check the clocking
Assemble without sealing anything. Confirm the fitting points where you want it, the hose leaves without strain, and the nut has wrench access. This is your last free chance to change your mind.
5 · Fit the O-rings and tighten
Use new A/C O-rings on the port end, lightly oiled with the correct refrigerant oil for your system. Tighten the bulkhead nut firmly and evenly. It clamps sheet metal, so more is not better — overtightening dishes the panel and the seal gets worse, not tighter.
6 · Pressure-test before the dash goes back
Test the whole system with the bulkhead accessible. Finding a weep here after the interior is in is a long afternoon. The pressure-test section of the hose guide covers nitrogen, the Air Source packages and the deep-vacuum hold.
Do not use the nut to pull the panel together. If the fitting does not sit flat, the hole is wrong — out of round, not deburred, or not on a flat. Fix the hole. A bulkhead nut torqued against a distorted panel is a leak with a delay on it.
When a bulkhead fitting is not the answer
Pass the hose through
If you truly cannot terminate at the panel, a rubber grommet sized for the hose at least protects it from the edge. It is a compromise, not a seal, and the hose still moves.
214-2200, fits #6–#12 →Weld-on or bulkhead-in-tube
On a fabricated system running aluminum line, a weld-on fitting at the panel can be neater than a hose bulkhead. Different skill set, different tools.
Weld-on fittings →Send us the dimensions
If the routing is awkward or the panel is unusual, we build hose assemblies to order and can work the bulkhead into the design rather than around it.
Custom hose service →Common mistakes
- Forgetting the nut. The fitting and the nut are separate line items. Order one nut per fitting, in the matching Size.
- Drilling before dry-fitting. The hole is the one part of this job you cannot undo. Assemble first.
- Using a straight fitting where the line has to turn. The bend lands on the crimp. Buy the 90°.
- Reusing O-rings. They are a few cents in a 10-pack and they are the seal. Use new ones, and use A/C O-rings rather than whatever is in the drawer.
- Leaving the hole raw. Deburr and treat the edge, or you have built a rust site into the firewall.
- Overtightening the nut. It clamps sheet metal, not a flange. Firm and even, then stop.
- Mixing barrier types. The hose, the fitting and the crimp die all have to match. A bulkhead fitting is no exception.
Bulkhead fitting FAQ
What is an A/C bulkhead fitting?
What sizes do you stock bulkhead fittings in?
Does the bulkhead nut come with the fitting?
What thickness of panel will a bulkhead fitting fit?
Should I use a straight or a 90 degree bulkhead fitting?
Can I just run the hose through a grommet instead?
What is a bulkhead plate and when would I use one?
Do bulkhead plates come with fittings and O-rings?
How tight should the bulkhead nut be?
Do bulkhead fittings work with R-1234yf?
Can I add a bulkhead fitting to an existing system?
Where should the bulkhead go on the firewall?
Bulkhead fittings, hose and O-rings in one place
Bulkhead fittings and nuts in #6, #8 and #10, multi-line plates, barrier hose by the foot, and the O-rings to match. Building a system and not sure how the lines should cross the firewall? Call with your panel and your routing and we will work it out with you.
Related reading: How a car A/C system works, component by component · How to build a custom A/C hose · A/C fitting sizes explained · Custom A/C fabrication for hot rods